![]()
GO-25 SciRPN closely simulates the venerable HP-25C Programmable Pocket Scientific Calculator. The HP-25C was released in 1976 and sold for a MSRP of $195. Virtually indistinguishable from the real item in operation, GO-25 is a powerful yet simple retro calculator.
Topics
This document is not an exhaustive reference manual; rather, it's a terse outline of the calculator's function and programming keys. I have structured this information so that prerequisite material generally comes first, thus, you are encouraged to read the topics sequentially.
In this document normal calculator keys are shown in bold, such as +, or CHS, or 4, or Σ+. Most keys can perform two other functions, however, one labeled in blue and and one labeled in gold. To execute one of these functions you first touch the corresponding colored prefix key, either g or f, followed by the desired function key.
![]()
So to compute the sine of a number you'd touch two keys, the f prefix key followed by the 4 key. However, this document will simply show the key as sin: the font color implies which prefix character is used. Similarly, touching the two keys g and 4 executes the inverse sine function sin-1. The only exception to this convention is when discussing programming and keycodes.
The PRGM-RUN switch ![]() controls the two basic calculator modes. In RUN mode, key presses are executed immediately and results shown
in the calculator display area. In PRGM mode, key presses are stored in program memory for later execution.
It's important to realize which mode the calculator is in, as it has ramifications that affect other operational characteristics
of the device.
controls the two basic calculator modes. In RUN mode, key presses are executed immediately and results shown
in the calculator display area. In PRGM mode, key presses are stored in program memory for later execution.
It's important to realize which mode the calculator is in, as it has ramifications that affect other operational characteristics
of the device.
(As you'll learn later there are two variants of RUN mode, for three actual calculator modes.)
To get the feel of your new calculator, try a few simple calculations. First, perform these operations:
To calculate the surface area of a sphere, the formula `A_(surface)=pid^2` can use used, where d is the diameter of the sphere. Ganymede, one of Jupiter's 12 moons, has a diameter of 3,200 miles. You can use the calculator to manually compute the area of Ganymede in square miles. Merely press the following keys in order:
| Press | Display |
| 3200 | 3200. |
| ! | 10240000.00 |
| % | 3.14 | ? | 32169908.77 |
After calculating the surface area of Ganymede, one of Jupiter's 12 moons, suppose you decided you wanted the surface area of each moon. You could repeat the procedure you used for Ganymede 12 times, using a different diameter d each time; however, an easier and faster method is to create a program that will calculate the surface area of any sphere from its diameter rather than pressing all the keys for each moon.
To calculate the area of a sphere using a program, you should first write the program, then you must load the program into the calculator, and finally you run the program to calculate each answer.
!
%
?
The calculator will now remember this keystroke sequence.
When you press R/S, the sequence of keystrokes you loaded is automatically executed by the calculator, giving you the same answer you would have obtained manually. So now, in short order, you can calulate the surface areas of Io (2310 miles), Europa (1950 miles) and Callisto (3220 miles):
| Press | Display |
| 2310 R/S | 16763852.56 |
| 1950 R/S | 11945906.07 |
| 3220 R/S | 32573289.27 |
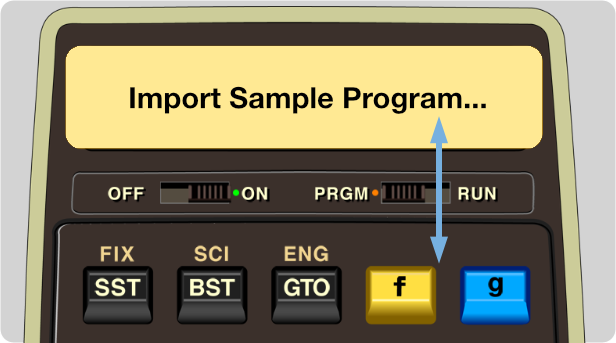
The GO-25 LED window acts as a display area, as well as a touch sensitive input area that initiates further activities not available on an actual HP-25C. The calculator display is also modal, so what it displays and how it reacts to touches depends on the setting of the PRGM-RUN switch.
A similar concept exists for Apple TV, based on focus navigation rather than touch, see section
GO-25 and Apple TV for details.
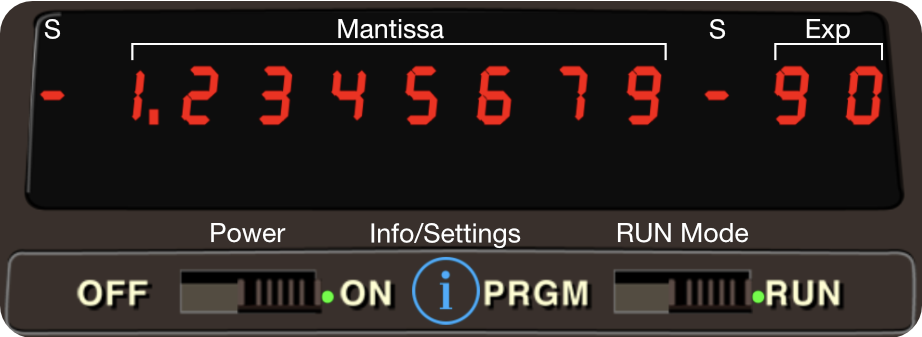
In RUN mode the display shows the X stack register, usually the result of the latest calculation.
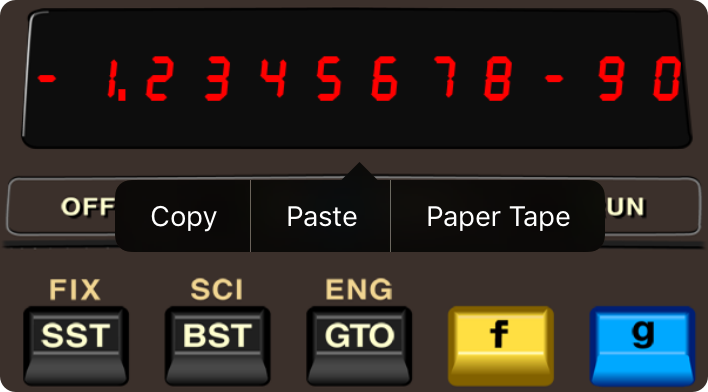
Tapping the display in RUN mode
brings up the Copy / Paste / Paper Tape menu, allowing you to export the value of X, import a new value of X, or annotate the paper tape (Copy / Paste unavailable on Apple TV).
In GO-25, numbers in the display normally appear rounded to only two decimal places.
For example, the fixed constant π, which is actually in the calculator as 3.14159265358979, normally
appears in the display as 3.14 (unless you tell the calculator to show you the number
rounded to a greater or lesser number of decimal places).
Although a number is normally shown to only two decimal places, GO-25 always computes
internally
using each number as a 14-digit mantissa and a two-digit exponent of 10.
Three keys control how numbers are displayed.
FIX allows numbers to be displayed in fixed decimal point format,
SCI displays numbers in scientific notation format, and
ENG displays numbers in engineering notation,
with exponents of 10 shown in multiples of three (e.g., 103, 10-6, 109) . Display control
alters only the manner in which a number is displayed, the actual number itself is not altered by any of the display control keys.
To select a display mode press one of the display mode keys
followed by a number key to specify the number of decimal places (0-9) to which the display is to be rounded.
GO-25 switches the display from fixed point notation to full scientific notation
(SCI 7) whenever the number is too large or too small to be seen with a
fixed decimal point.
This feature keeps you from missing unexpectedly large or small answers.
You can key in numbers multiplied by powers of 10 by pressing EEX (enter exponent of ten). You can save time when
keying in exact powers
of 10 by merely pressing EEX and then pressing the desired power of 10. To key in negative exponents of 10, key in the number,
press EEX, press CHS to make the exponent negative, then key in the power of 10.
When a number is greater than 9.9999999 x 1099 an overflow has occurred and
9.9999999+99 is displayed instead. Other illegal operations, such as a divide by zero,
display the word
Error, then set the illegal number to zero.
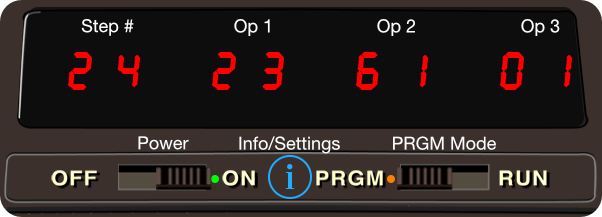
In PRGM mode the calculator display shows the current program step. The left-most two digits are the actual program step number, and the
remaining digits represent the step's instruction opcodes, fully described in the section Key Codes.
It's this mode that allows you to manually enter a program into the calculator, just like an authentic HP-25C.
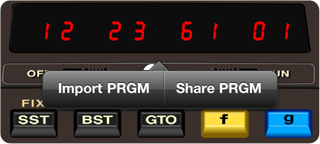
Tapping the display in PRGM mode
brings up the Import PRGM / Share PRGM menu, allowing you to transfer GO-25 programs
to / from the App (for Apple TV only Sample Programs are available for import).
RUN Mode
PRGM Mode
Automatic storage of intermediate results is the reason that GO-25 slides so easily through the most complex equations. The displayed X register, which is the only visible register in the calculator display, is one of four registers inside the calculator that are positioned to form the automatic memory stack. We label these registers X, Y, Z, and T. They are "stacked" one on top of the other with the displayed X register on the bottom and T at the top.
|
T |
4.00 |
|
Z |
3.00 |
|
Y |
2.00 |
|
X |
1.00 |
The R↓ (roll down) and X⇔Y (X exchange Y) keys allow you to review the stack contents or to shift data within the stack for computation at any time. Each time you press the R↓ key the stack contents shift downward one register, with the contents of X rotating up to the T register. Notice that the contents of the registers are shifted - the registers themselves maintain their positions. Always remember, though, that it takes four presses of the R↓ key to return the contents to their original registers.
The X⇔Y (X exchange Y) key exchanges the contents of the X and Y registers without affecting the Z and T registers.
To clear the displayed X register only, press CLX. To clear the entire automatic memory stack, including the displayed X register, press CLEAR STK (clear stack). This replaces all numbers in the stack with zeros.
The ENTER key lifts the stack, by copying the contents of Z into T, Y into Z, X into Y, hence losing the contents of T and duplicating the contents of X.
The opposite of lifting the stack is called dropping the stack. When the stack drops, Y is copied to X, Z is copied to Y, and T is copied to Z, hence losing the contents of X and duplicating the contents of T.
One-number functions such as m execute upon the number in the X-register only, and the answer writes over that number. No other stack registers are affected by executing a one-number function.
Two-number functions such as p, or arithmetic operations such as /, execute upon two stack registers, X and Y. Obviously, for the power function first enter the base followed by z to lift it into Y, then enter the power into X and press p to perform the function.
For arithmetic operations imagine the stack as an old-fashioned sheet of paper, where in the case of division, the divedend (Y) is written on top of the divisor (X), then the / operation is executed. Addition, subtraction and muliplication work the same way, both numbers are positioned in the stack in the natural order, there are no exceptions to this rule.
You can use s and a as required to re-order the operands. In all cases after the function or operation is executed the stack drops and the answer is written over X (the old Y before the stack drop).
In addition to the automatic storage of intermediate results that is provided by the four-register automatic memory stack, the calculator also has 10 addressable data storage registers that are unaffected by operations within the stack. These storage registers allow you to manually store and recall constants or to set aside numbers for use in later calculations. Like all functions, you can use these storage registers either from the keyboard or as part of a program. All 10 storage registers reside contiguously in Continuous Memory and maintain their contents even when the calculator is turned OFF.
The diagram below shows all storage registers. The addresses of the primary storage registers are indicated by the numbers 0 through 9.
|
Primary |
|
R₀ |
|
R₁ |
|
R₂ |
|
R₃ |
|
R₄ |
|
R₅ |
|
R₆ |
|
R₇ |
|
R₈ |
|
R₉ |
Recalling a number causes the stack to lift unless the preceding keystroke was z, v or g.
When you recall a number, it is copied from the storage register into X, and it also remains in the storage register. You can recall a number from a storage register any number of times without altering it; the number will remain in the storage register until you overwrite it by storing another number there, or until you clear the storage registers.Remember that because of the Continuous Memory of the calculator the primary storage registers retain their contents even though the calculator is turned OFF.
Arithmetic is performed upon the contents of the storage register by pressing STO, followed by the arithmetic function key, followed in turn by the register address.
If the magnitude of a number in any of the ten storage registers exceeds 9.999999999 x 1099, the display immediately shows OF (overflow) to indicate that a storage register has overflowed.
When you then press any key, the error condition is cleared and the last value in the X register before the error is again displayed. The storage registers all contain the values they held before the error-causing operation was attempted.
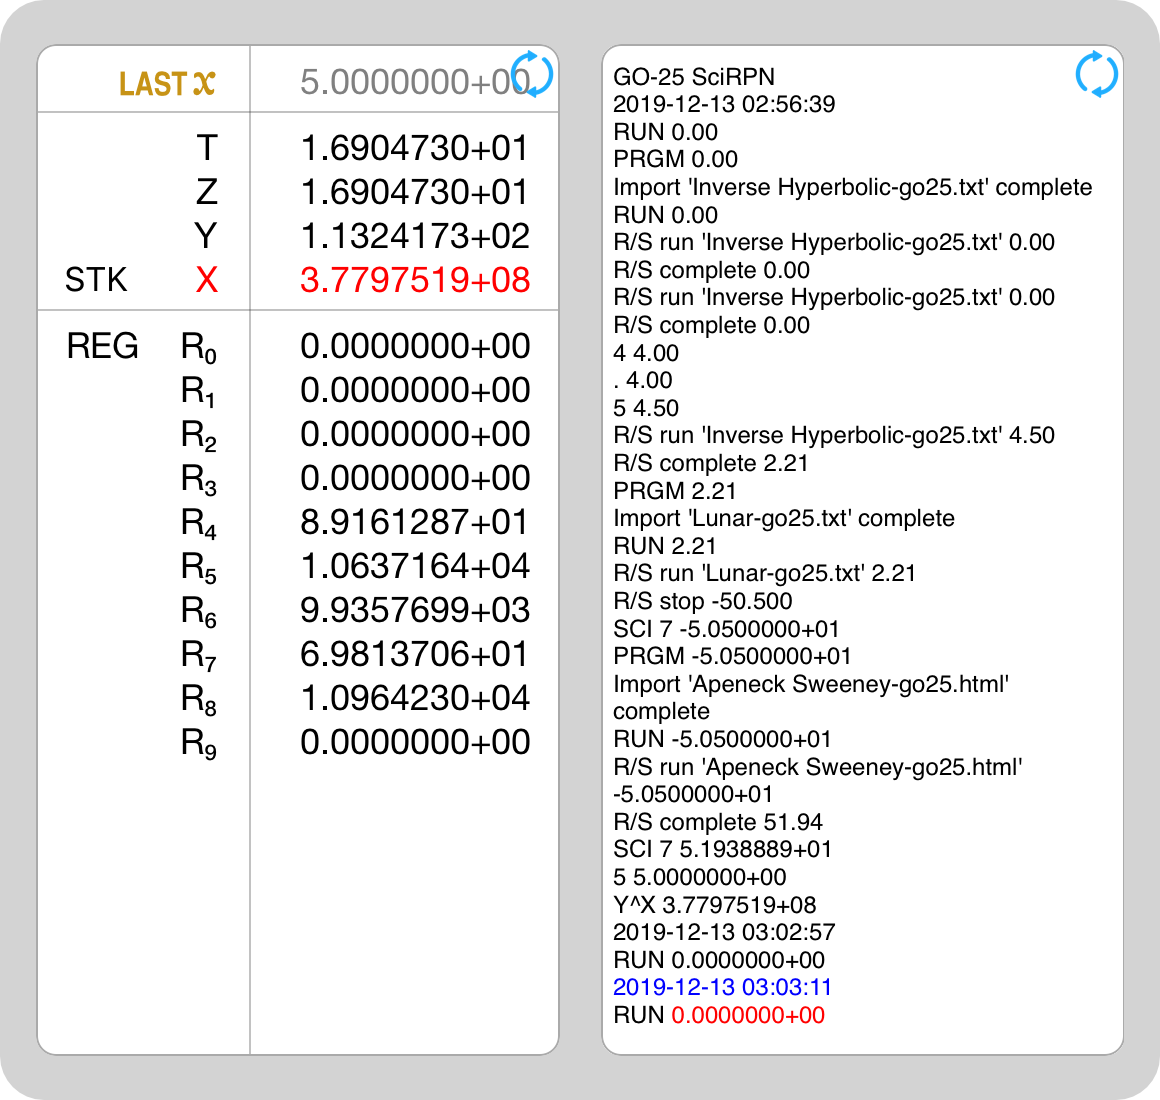
GO-25 provides two distinct, scrollable, views of the calculator's internal state unavailable on the real hardware. This makes using the calculator, and programming and debugging code much easier. Access to this additional information is controlled by a double-tap on the calculator display. If the information view is visible, a double-tap hides the view. If the view is not visible, the information view appears. So a double-tap toggles the visibility of the auxiliary information. If you eschew gestures and prefer buttons, enable the Accessibility setting Auxiliary Views Assist.
Similar to the calculator display, the information that's displayed is dependent on the setting of the PRGM-RUN switch.
(Note: unlike for iPhone and iPod touch, which have tiny screens, on Mac and iPad both information views are by default always visible, but you can hide them with two double-taps, if desired, one in PRGM mode and one in RUN mode. For Apple TV the information views are always visible and cannot be hidden.)
Both auxiliary information views include this
In RUN mode the 4 stack registers, the 10 storage registers, and the LAST X
register are displayed in the stack and register window.
Touching the In PRGM mode the program listing is shown. The listing displays the program name and description, and the step numbers,
opcodes and mnemonics for all program steps. Both the program listing and program description are scrollable and editable.
The current step pointer (SP) is highlighted by a right pointing double arrow. In RUN mode this is the next instruction
to be executed via SST or R/S. In PRGM mode you edit the step following the SP unless you've turned
on GO-25 Step Editing from the Settings menu, in which case you edit the SP directly.
In PRGM mode you can also move the arrow pointer to any step by just touching the step. If you touch and hold a program listing step,
a contextual menu appears so you can add any extended GO-25 opcodes described in the
section Special 8* Opcodes.
Finally note there is a touchable ![]() touch point that toggles what the view shows, detailed in the following two sections.
touch point that toggles what the view shows, detailed in the following two sections.
RUN Mode
![]() switch-views control
transitions to the paper tape window and shows up to 200 lines of key-press history to help you make sense of the values you see in the stack-register window.
switch-views control
transitions to the paper tape window and shows up to 200 lines of key-press history to help you make sense of the values you see in the stack-register window.
PRGM Mode
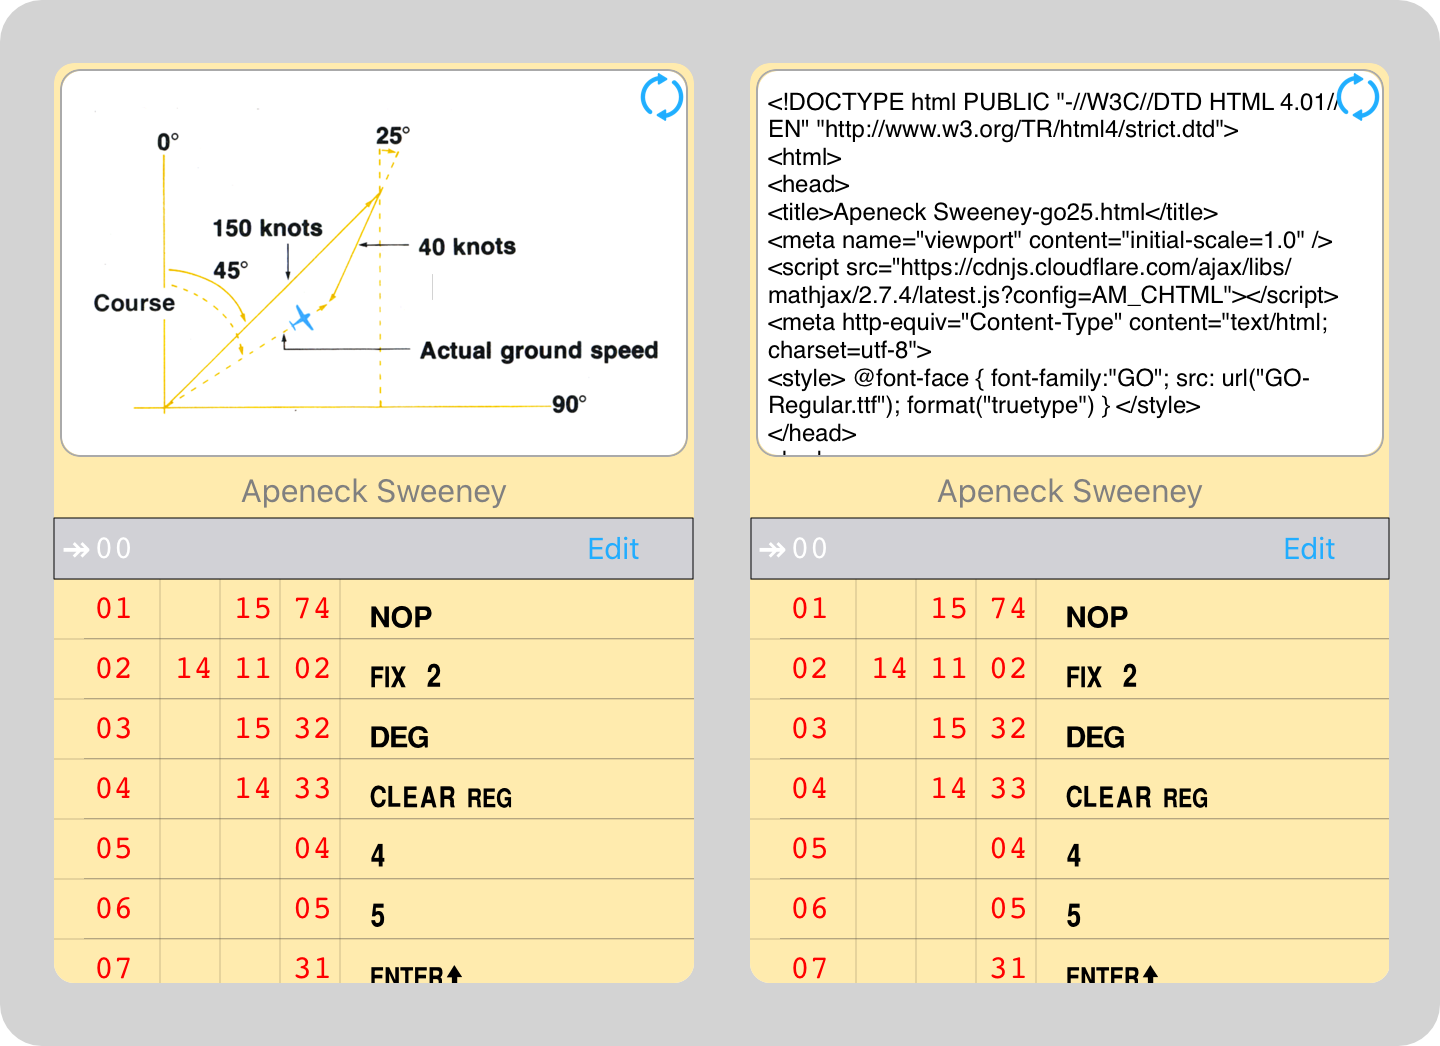
![]() switch-views control that controls how to display your program's description: either plain Text or full HTML. The default is Text with semi-colon as the comment character. But HTML allows for rich text and cool things like mathematical equations. This is explained in the section Naming and Documenting Your Program.
switch-views control that controls how to display your program's description: either plain Text or full HTML. The default is Text with semi-colon as the comment character. But HTML allows for rich text and cool things like mathematical equations. This is explained in the section Naming and Documenting Your Program.
In addition to the four stack registers that automatically store intermediate results, GO-25 also contains a separate automatic register, the LAST X register. This register preserves the value in the displayed X register before a new function is performed.
The CLEAR PREFIX key will clear a blue prefix key t, a gold prefix key r, STO, RCL, or GTO. To clear a prefix you have mistakenly pressed, merely press CLEAR PREFIX, then press the correct key.
Some calculations require the absolute value, or magnitude, of a number. To obtain the absolute value of the number in the display, press ABS.
To extract and display the integer portion of a number, press INT. The fractional portion of the number is lost. The entire number, of course, is preserved in the LAST X register.
To place only the fractional portion of a number into the displayed X-register, press FRAC. The integer portion of the number is lost. The entire number, of course, is preserved in the LAST X register.
To calculate the reciprocal of a number in the displayed X register, press 1/X.
To calculate the square root of a number in the displayed X register, press √X.
To square a number in the displayed X register, press X².
The value π accurate to 14 places (3.14159265358979) is provided as a fixed constant in GO-25. Merely press π whenever you need it in a calculation.
The % key is a two-number function that allows you to compute percentages. To find the percentage of a number:
For example, to calculate the sales tax on a purchase, the purchase price is the base number and the sales tax is the percentage rate.
When % is pressed, the calculated answer writes over the percentage rate in the X register, and the base number is preserved in the Y register. Since the purchase price is now in the Y register and the amount of tax is in the X register, the total amount can be obtained by simply adding.
Note: 360 degrees = 2π radians = 400 grads.
The six trigonometric functions provided by the calculator are:
Each trigonometric function assumes angles in decimal degrees, radians, or grads. Trigonometric functions are one-number functions, so to use them you key in the number, then press the function key.
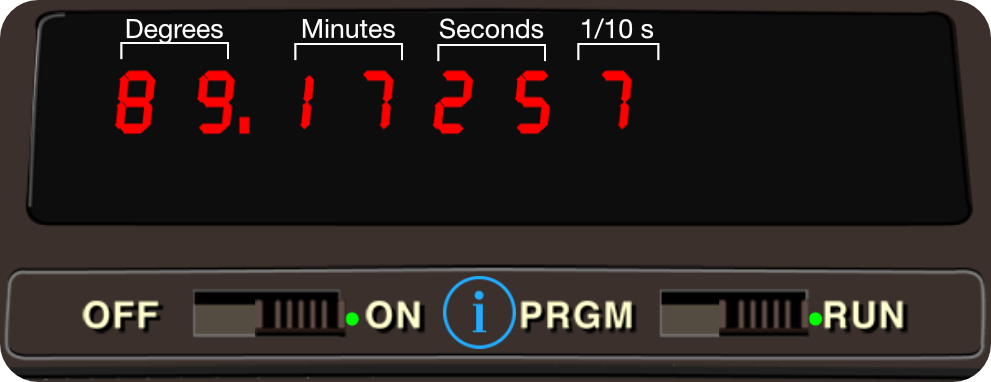
The T (to hours (or degrees), minutes, seconds) key converts decimal hours to the format of hours, minutes and seconds, or converts angles specified in decimal degrees to degrees, minutes, seconds. These hour and degree values are based on the sexagesimal (base 60) number system. When a time (or angle) is displayed in hours (or degrees), minutes, seconds format, the digits specifying hours (or degrees) occur to the left of the decimal point, while the digits specifying minutes, seconds, and fractions of seconds occur to the right of the decimal point. To see all these digits you should specify Q 5 display format. For example, the decimal number 89.29047° displays as 89°, 17′, 25.7″ in H.MS format:
Conversely, the $ (to decimal hours (or degrees)) key is used to change hours (or degrees), minutes, seconds into decimal hours (or degrees).
The $ and T keys are important because the calculator's trigonometric functions operate on angles in decimal degrees, but not in degrees, minutes, seconds. In order to calculate any trigonometric function of an angle given in degrees, minutes, seconds, you must first convert the angle to decimal degrees.
Two functions H and o are provided for polar/rectangular coordinate conversions. Polar angle θ is assumed in decimal degrees, radians, or grads, depending upon the trigonometric mode selected by P, {, or }.
To convert values in the X and Y registers representing rectangular (x, y) coordinates, respectively, to polar (r, θ) coordinates, magnitude and angle, respectively, press →P. Magnitude r then appears in the X register and angle θ is placed in the Y register.
Conversely, to convert values in the X and Y registers representing polar (r, θ) coordinates, respectively, to rectangular coordinates (x, y), press →R. Coordinate x then appears in the X register and coordinate y is placed in the Y register.
GO-25 computes both natural and common logarithms as well as their inverse functions (antilogarithms):
The p key is used to raise numbers to powers. This function raises a positive real number to any real power; that is, the power may be positive or negative, and it may be an integer, a fraction, or a mixed number. p also permits you to raise any negative real number to the power of any integer within the calculating range of the calculator.
In conjunction with O, p provides a simple way to extract roots. For example, the cube root of 5 is equivalent to 51/3 e.g.:
| 5 z |
| 3 O |
| p |
Pressing the Σ+ key automatically gives you several different sums and products of the values in the X and Y registers at once. In order to make these values accessible for sophisticated statistics problems, they are automatically placed by the calculator into storage registers R3 through R8 (GO-25 extension). The only time that information is automatically accumulated in the storage registers is when the Σ+ key is used. Before you begin any calculations using the Σ+ key, you should first clear the storage registers of data by pressing CLEAR REG.
When you press the Σ+ key each of the following operations is performed on the data in the X and Y registers:
Thus, each press of the Σ+ key updates these summations and multiplications. The contents of the displayed X register and the applicable storage registers are as follows:
In addition, the Y value present before the last press of the Σ+ key is retained in the Y register, while the X value present before Σ+ was pressed is retained in the LAST X register. To see any of the summations at any time, you have only to recall the contents of the desired storage register. (In the case of the Σ+ key, recalling storage register contents or keying in a number simply writes over the number of entries (n) that is displayed. The stack does not lift.)
The mean (arithmetic average) of data entered and summed using the Σ+ key is available by using the
![]() (mean)
key. When you press
(mean)
key. When you press ![]() , the mean of the values of X
is calculated using the data in storage registers R3 (n) and R7 (Σx).
, the mean of the values of X
is calculated using the data in storage registers R3 (n) and R7 (Σx).
The standard deviation (a measure of dispersion around the mean) is calculated using data in the applicable storage registers and the s (standard deviation) key. Pressing s uses the data in registers R3 (n), R6 (Σx2) and R7 (Σx).
If you key in an incorrect value and have not pressed Σ+ press CLX and key in the correct value. If one of the values is changed, or if you discover after you have pressed the Σ+ key that one of the values is in error, you can correct the summations by using the Σ- key as follows:
For an example of this, examine the Sample Program Apeneck Sweeney as he flies the Swordfish into a crossing headwind.
There are three ways to use your GO-25 calculator:
The functions and operations you have learned about in previous sections are performed manually one at a time with the PRGM-RUN switch set to RUN. These functions combined with the automatic register stack enable you to calculate any problem with ease.
In PRGM (program) mode the functions and operations you have learned about are not executed, but instead are recorded in a part of the calculator called program memory for later execution. All operations on the keyboard except three can be recorded for later execution with the PRGM-RUN switch set to PRGM. The three operations that cannot be recorded are:
These three operations work in PRGM mode to help you write and record your programs.
GO-25 can also be used to automatically execute a list of operations with the PRGM-RUN switch set to RUN if they have previously been recorded in program memory. Instead of your having to press each key manually, the recorded operations are executed sequentially in automatic RUN mode when you press R/S (run /stop). You press only one key and the entire list of recorded operations is executed much more quickly than you could have executed them yourself.
A program is nothing more than a series of calculator keystrokes that you would press to solve a problem manually. The calculator remembers these keystrokes when you key them in, then executes them, in order, whenever you wish. You've already seen this demonstrated in the section Programmed Problem Solving, which you may wish to review.
All HP-25C programming techniques work with GO-25, although this App has some useful extensions. The first is the amount of program memory available for storing the keystrokes that define your program, now increased to 99 steps. When you set the calculator to PRGM mode you can examine the contents of program memory; logically, here is how the surface area program `A_(surface)=pid^2` is stored:
|
00 |
|
|
01 |
! |
|
02 |
% |
|
03 |
? |
|
05 |
GTO 00 |
|
… |
… |
|
99 |
GTO 00 |
Each step of program memory can store a single operation, whether that operation consists of one, two or three keystrokes. Thus, one step of program memory might contain a single-keystroke operation like CHS, while another step of program memory could contain a two-keystroke operation, like STO 6. There are also three-keystroke operations, such as STO + 6.
However, what is actually stored in program memory are not instruction mnemonics, but rather keycodes, discussed now.
Let's write a program to compute the surface area of a sphere. For this discussion go into Settings and ensure that GO-25 Step Editing is turned on.
First, set the PRGM-RUN switch to PRGM so that the sequence of keystrokes will be recorded for later execution. Second, press CLEAR PRGM to clear the calculator of previous programs. The display will show:
00
This tells you that you are at step 00, the beginning of program memory. Step 00 contains an automatic stop instruction and cannot be
used to record your program keystrokes. Program keystrokes are recorded in steps 01 through 99.
The program memory for GO-25 is separate from the four stack registers, the
LAST X register, and the ten storage registers.
With 00 displayed in PRGM mode, you are ready to key in your program. Surface area of a sphere is calculated using the formula A = π d². The short list of keys for the area of a sphere program is:
        g X2  ; square the diameter
        g π   ; load X with π
        x     ; multiply d² by π
Press the first key of the program and the display will change to:
01 15
Since it's impossible to key anything into step 00 this first key is recorded in step 01.
The two numbers on the right of the display designate the key stored in that step. Each key on the keyboard has a two-digit keycode.
For convenience, the digit keys are coded 00 through 09. All other keys are coded by their position on the keyboard.
The first digit denotes the row of the key and the second digit the number of the key in that row.
So 15 tells you that the key is in the first row on the calculator and that it is the fifth key in that row, the
g key.
This handy matrix system allows you to easily determine the code for each instruction without using a reference table.
To conserve program memory when using prefixed functions, the keycodes for the prefix and the function are merged into one step. For an example of this press the second key of the program, X2, and the display will change to:
02 13 00
Whoa, what just happened? The calculator is smart enough the realize that program step 01 is complete, and
has stored that step into program memory and advanced its internal step pointer to step 02,
ready for you to key in the next instruction. To see step 01 just look at the program listing view if it's visible. If it's
not visible make it so with a swipe-up, or touch the BST key to back-step the step pointer so that step 01 is visible
in the calculator display. You will see this:
01 15 02
The two-number code 01 on the left side of the display designates the step number of program memory that is being displayed. The two pairs of numbers on the right side of the display indicate that the function X2 has been recorded in that step of program memory. Digits 1 and 5 denote the g key. Digits 0 and 2 denote the 2 key. The operation stored then, is g 2 which is the X2 function. In every case, a single operation uses only one step of program memory.
Before proceeding to enter the rest of the program, if you used the BST key to review step 01, now touch the SST key to single-step back to step 02. To edit a step it must be visible in the calculator display.
The keys for finding the area of a sphere and their corresponding codes are shown below. Press each remaining key in turn and verify the keycodes shown in the display.
            g X2   01    15 02
            g π    02    15 73
            x      03       61
In this case, a program consisting of five keystrokes takes only three steps of program memory.
GO-25 provides four extended keycodes, the 8* series, named because they assume the existence of an 8th row of calculator keys. Because there are no such keys, these opcodes are inserted using a contectual menu activated from the program listing auxiliary view. The new instructions, DMP, BEL, SEC and RND are explained in the section Special 8* Opcodes.
Switch the PRGM-RUN switch to PRGM to enter program steps into the calculator. Function keys are recorded in program memory. Display shows program memory step number and the keycode (keyboard row and location in row) of the function key.
To clear program memory and reset the step pointer to the beginning of program memory press CLEAR PRGM. (Note that CLEAR PRGM cannot be recorded in program memory; otherwise, there would be no way to clear program memory!)
This key, single step, also cannot be recorded in program memory in PRGM mode, as it's used to advance the step pointer forward for examining and/or changing program steps. (Used in automatic RUN mode, the SST key displays the step number and keycode of the current program memory step when pressed; executes instruction, displays result, and moves to next step when released.)
This key, back step, also cannot be recorded in program memory in PRGM mode, as it's used to move the step pointer backwards for examining and/or changing program steps. (Used in automatic RUN mode, the BST key displays the step number and keycode of the previous program memory step when pressed; moves to previous step when released - the program is not run in reverse.)
Go to. Executed as a recorded program instruction, followed by a two-digit step number, causes the calculator to execute the instruction at the specified step number next, and continue program execution sequentially from there. (Used via the keyboard, positions the internal step pointer.)
Run/Stop. Executed as a recorded program instruction, stops program execution. (Use via the keyboard, begins execution of a stored program. Stops execution if program is running.)
Pause. Executed as a recorded program instruction, stops program execution for 1 second and displays contents of the X register, then resumes program execution.
No operation. Calculator executes no operation and continues program execution sequentially with the instruction in the next program memory step.
Conditionals. Each tests the value in the X register against that in the Y register or 0 as indicated. If true, the calculator executes the instruction in the next program memory step. If false, the calculator skips the next step and continues execution after the skipped program step.
The section Programmed Problem Solving provided a concise overview of how to write, load and run our surface area of a sphere program. Let's delve deeper into those topics.
Here's the program we developed in the previous section:
Programs are executed in automatic RUN mode. So first set the PRGM-RUN switch to RUN.
Next press GTO 00. This operation resets the calculator so that program execution will begin
from step 00 (pressing CLEAR PRGM in RUN mode accomplishes the same thing).
Then, key in a value for a diameter and press R/S in RUN mode to run your program.
The operations stored in program memory are executed sequentially downward from step 00. First step 01 is executed,
then step 02, then step 03, and then step 04, which now contains a special instruction, GTO 00. For example,
if you entered the diameter of Mercury = 4879.4 km then presssed
R/S, the computed surface area is 74796748.05 square kilometers..
The GTO 00 instruction in step 04 is not an instruction you keyed in yourself.
It was already there. If you press CLEAR PRGM in PRGM mode, program memory is filled with GTO 00 instructions.
The three-step program you keyed in replaced three of these instructions.
A GTO 00 instruction in the program tells the calculator to go to step 00 and execute the
automatic stop instruction there next. If R/S is pressed again in automatic RUN mode, the
calculator will begin executing instructions from step 00 as it did the first time.
Each time the calculator executes the program, it ends execution at step 00, ready to begin again.
If you had recorded a 99-step program, after executing step 99 the calculator would execute the automatic stop instruction
stored in step 00. Then you would have to press R/S to execute the program again.
Debugging a program on an actual HP-25C can be very difficult because you cannot easily see the state of the calculator's storage registers without recalling them individually to the stack. On the other hand, GO-25's auxiliary information views, Settings, and 8* series of new instructions give an unparalleled view of the registers and stack, making debugging much easier.
Running A GO-25 Program
            01 15 02
            02 15 73
            03 61
GO-25 Debugging
If all you need is to see the stack registers, then the SST single step command works beautifully. To use this method, do not start program execution with R/S, rather, position the step pointer to the first program step using GTO then press SST. This runs that step and only that step. Then you can manipulate the stack and check the contents of the four registers for sanity. Repeat as required.
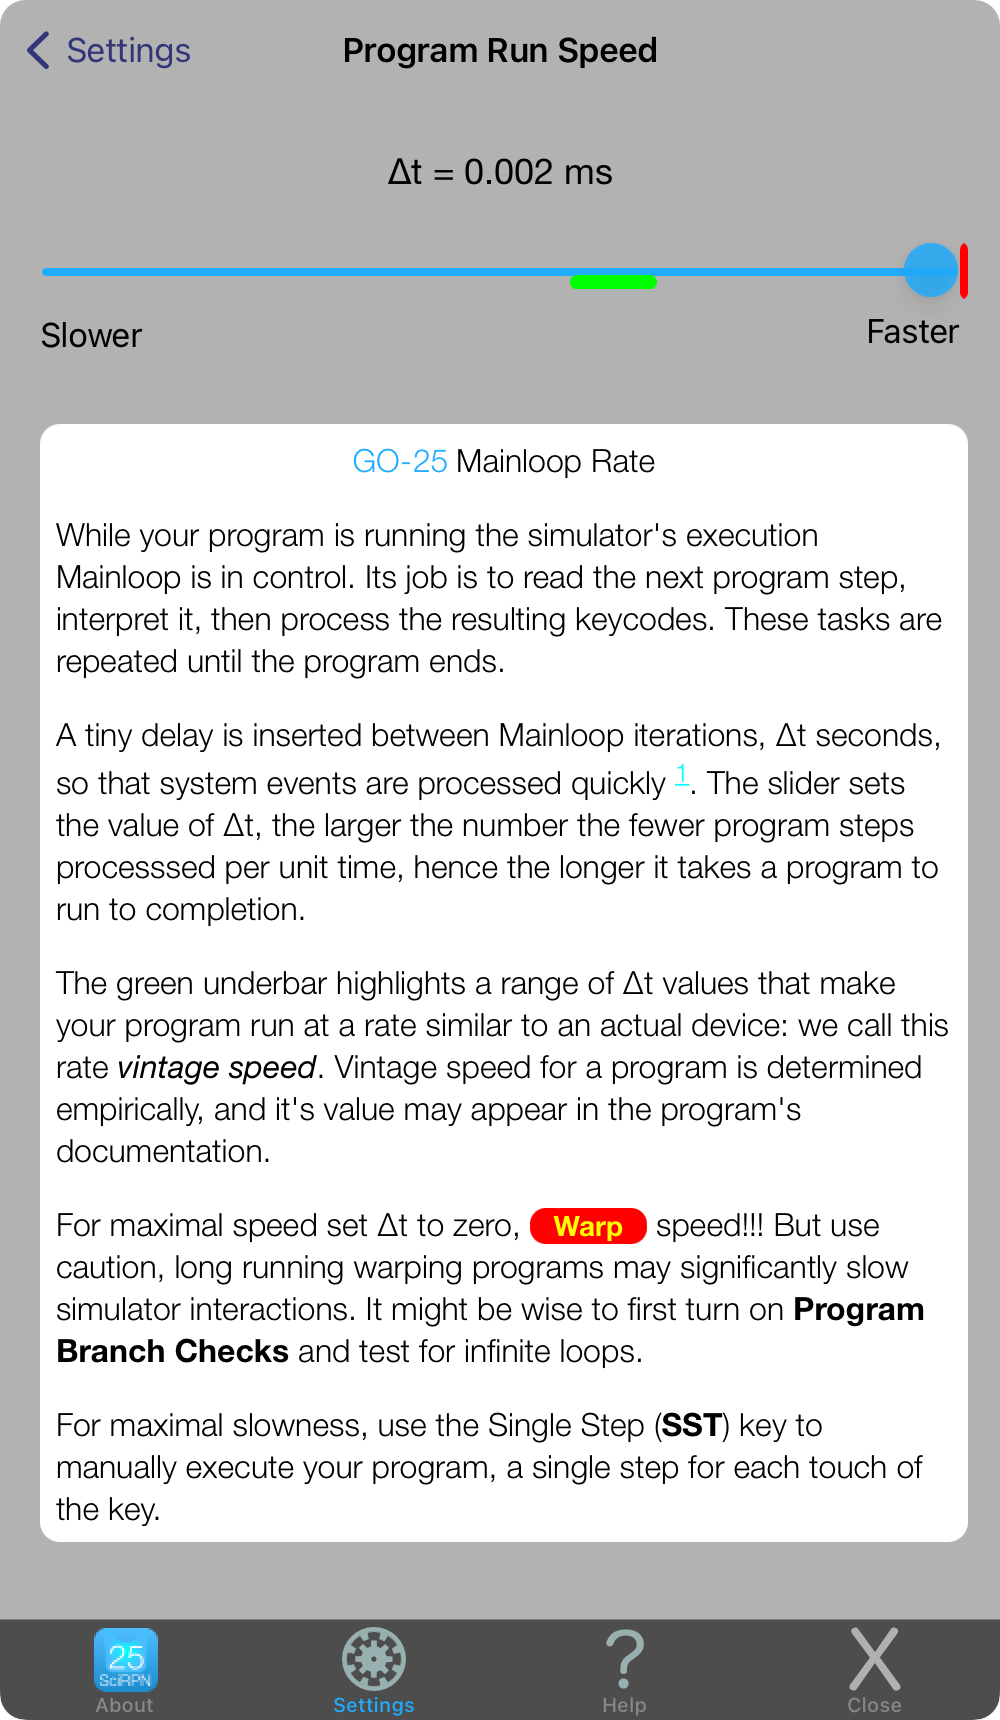
The Settings option Program Run Speed controls how fast a program runs by varying the time delay before running subsequent program steps.
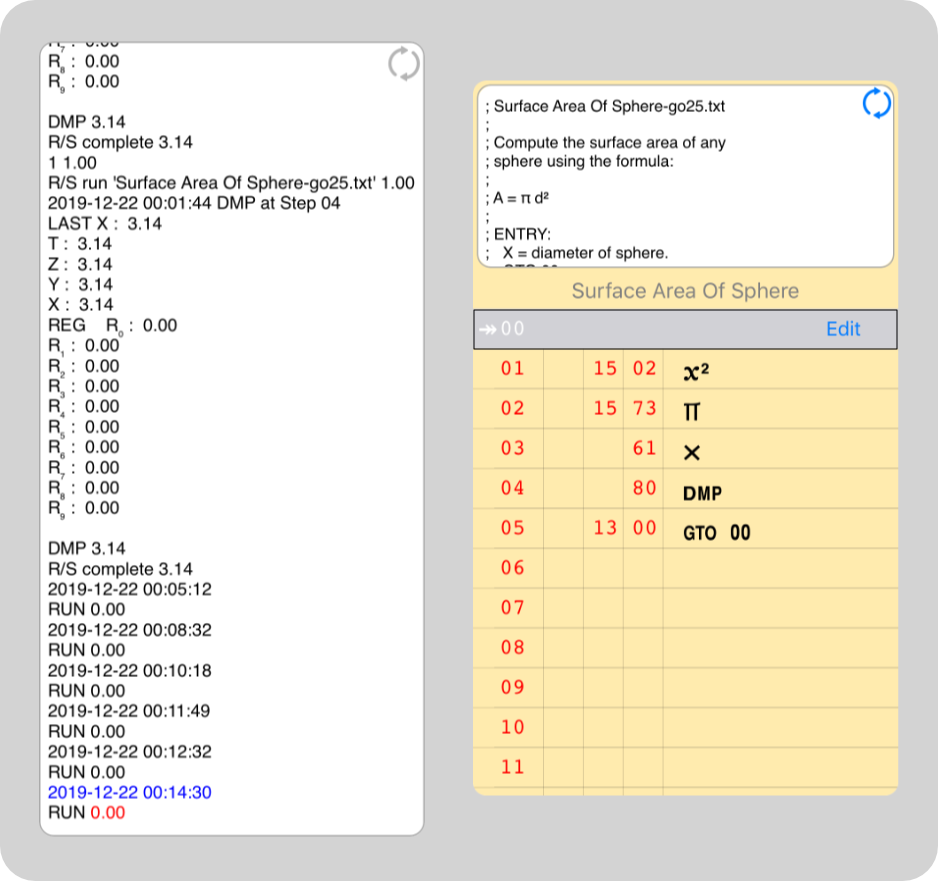
Inserting opcode 80 in your program dumps the calculator's internal state to the paper tape. Here we see the calculator's register values after computing the surface area of the unit sphere.
Editing a program in PRGM mode consists of three basic maneuvers: clearing stuff, positioning the step pointer to an instruction of interest, and replacing the instruction after1 the step pointer with a NOP instruction or with a new instruction. GO-25 adds "full screen" editing to the mix, which inserts and deletes NOP instructions and rearranges instructions (including resequencing GTO instructions as necessary).
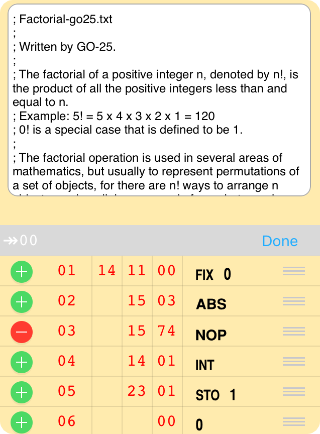
Touching a green plus inserts a NOP before that step, and simultaneously drops program step 99. Touching the red minus removes that NOP. Touching and dragging a gripper pad moves that program step, re-inserting it when you have reached the destination and released the gripper.
All GTO targets are automatically re-sequenced.
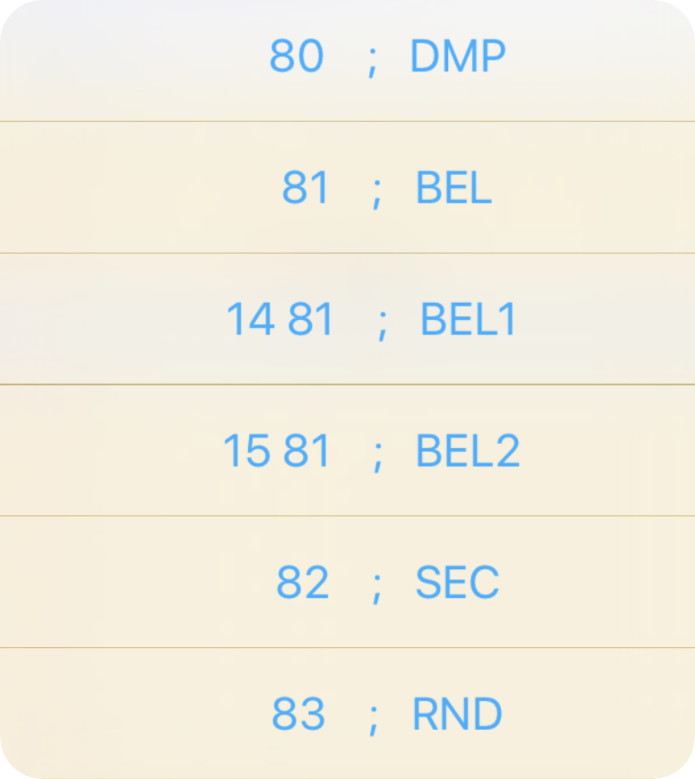
GO-25 supports six special opcodes not available on a real HP-25C. These are collectively known as the 8* series of instructions, named because they exist on a theoretical 8th row of calculator keys having an infinite number of columns. You cannot key these instructions in, but they can be typed as part of a program imported into the calculator. Or, in PRGM mode, if you touch and hold a program listing step, a contextual menu appears so you can add extended GO-25 opcodes. See the section on keycodes for background information.
A GO-25 program can exist by itself, a simple stream of step numbers and instructions, just like an HP-25C program, or it can be bundled with its documentation in a structure called a Program Package. These descriptive comments can be simple Text, or expressive HTML markup.
A Program Package is really easy to maintain, it's just a file (ASCII or UTF-8 Unicode), and consists of two parts: the documentation at the top / beginning, immediately followed by the program. That's it. Simple enough to manage in most any editor you choose.
Generally, it's useful to associate a name with a program, and GO-25 tries to extract the name from the documentation as the program is being read into memory. If you provide no documentation at all, or do not adhere to the following prescribed naming rule, then Untitled-go25.txt is used.
While the program is being read into memory GO-25 is also scanning the documentation to determine if it's plain Text or rich HTML, by searching for a case-insensitive <html> / </html> tag pair. This defines the start and end of the HTML documentation; if those two strings are not found then the documentation is assumed plain Text.
Finally, the prescribed program naming rule is:
The extension simply reminds humans of the documentation type, and reminds computers that the program is an editable file.
Lacking <html> / </html> marker strings, program documentation is assumed plain Text, with the semi-colon as the comment character.
All comments appearing before the first program step 01 are gathered together
and appear in the top
of the program listing window. This window is editable, and the descriptive text is saved with the program steps when
the program is exported.
By definition the very first documentation line specifies the program name, excluding the semi-colon, of course.
e.g. ; Einstein Tensor-go25.txt
For example:
If <html> / </html> marker strings are present, program documentation is assumed to be HTML.
The HTML is rendered and displayed in the top of the program listing window.
Program step 01 immediately follows the </html> tag. This HTML window is not editable - touch the switch-views
By definition a <title> / </title> tag pair surrounds the program name.
e.g. <title>Einstein Tensor-go25.html</title>
The title tag is contained in the document's <head> section, you will want to include these lines as well:
For example:
Text Documentation
HTML Documentation
![]() control to toggle into Text mode to view and edit the raw HTML source.
The descriptive text is saved with the program steps when
the program is exported.
control to toggle into Text mode to view and edit the raw HTML source.
The descriptive text is saved with the program steps when
the program is exported.
<meta http-equiv="Content-Type" content="text/html; charset=utf-8">
<meta http-equiv="Content-Style-Type" content="text/css">
<meta name="viewport" content="initial-scale=1.0" />
Note: For Apple TV this section is not applicable.
Beginning with iOS 11 managing your programs is relatively easy using Apple's Files App. Files not only provides a storage location for your programs such as iCloud Drive or Dropbox, but also allows you to create subfolders and maneuver between them, which means you can setup a file hierachy that is meaningful to you. To take advantage of theses capabilities, incorporate Files in your import and export workflows.

If you have iCloud Drive configured then GO-25 creates a folder similar to this for Files to store and retrieve your programs. Tapping the display in PRGM mode brings up the Import PRGM / Share PRGM menu, allowing you to transfer GO-25 programs to / from the App.
Additional help is available in the following sections Importing Programs and Sharing Programs.
If you enable the Settings option Persist Program Registers, when a program is shared (saved) all the device register values are saved with it. Subsequently, when you import (open) that program device registers are restored to their previously saved values. This behavior is implemented via a special comment in the program's documentation of the form:
Inside the Registers element is a list of comma-separated
double precision numbers: 4 for the stack X, Y, Z and T registers, 1 for the LAST X register, and n numbers for the memory registers, where n = 10 for
Of course, nothing prevents you from editing the registers list manually; for instance, this list for
presets the device registers to this:
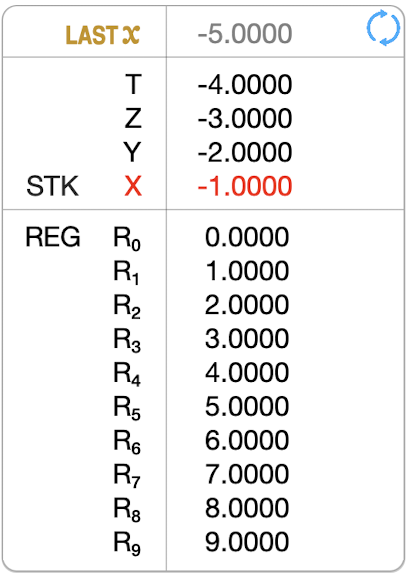
If there are registers you do not want to preset then leave their value in the list empty; for instance this list initializes all registers excluding the 4 stack registers:
Notes:
Note: For Apple TV this section is not applicable, see GO-25 and Apple TV.
On an actual HP-25C programs are entered using the calculator keys. That method works with GO-25 as well, but it's often easier to edit your programs in another App and import them into GO-25 (activate the Import menu by touching the calculator's display in PRGM mode). For instance, you can use Mail to write your program, then copy the program to the pasteboard, switch to GO-25, and import the pasteboard data. As a bonus, when you are finished editing the program simply email it to yourself for later filing in your GO-25 programs folder.
You also have a My Programs container that uses File Sharing to sync programs between your computer and GO-25.
Alternately, Apps like Files use the iOS Document Model and have a menu to open their documents in another App (labelled variously as Add to appName, Copy to appName, Open in appName, or Save to appName). If such an App sends a program (named, say, SurfaceAreaOfSphere-go25.txt) to GO-25, that program's name appears in the Import PRGM window.
Finally, a small selection of programs is included in GO-25's Sample Programs container.

For macOS, in PRGM mode, you can also import a program using the File menu item Open.
Note: For Apple TV this section is not applicable.
You can export a program in various ways using the Share PRGM menu item (activate the Share menu by touching the calculator's display in PRGM mode). Besides the pasteboard, email and printing, you also have a My Programs container that uses File Sharing to sync programs between your computer and GO-25.
GO-25 also supports the iOS Document Model and allows other Apps to open its program files via the Open In Another App menu item. When sending a program to another App, GO-25 uses the program name to identify the program. For example, use this option to export a program to the Files App.

For macOS, in PRGM mode, you can also export a program using the File menu item Save.
Unsupported programs that you may copy to the pasteboard and then import into GO-25 while in PRGM mode.
Complex Operations-go25.txt
; Complex Operations-go25.txt
; Written by Eddie Shore
; May 8, 2011
;
; V 1
;
; This program calculates the following:
; 1.  (a + bi)^n. (principal power and root)
; 2.  exp(a + bi)
; 3.  ln(a + bi)
;
;
; Registers:
; R0 = temp
; R1 = real part
; R2 = imaginary part
; R3 = power
;
;  Results:
; y stack: imaginary part
; x stack: real part
;
;
; Example:
; Find (2.8 + 2i)^4, exp(2.8 + 2i), and ln(2.8 + 2i)
;
;  Store the complex number to be operated on:
;  2.8 STO 1
; 2 STO 2
; 4 STO 3
; for the power:
; 1 R/S. (-110.6944 + 86.0160i)
; for the exponential:
; 2 R/S (-6.8434 + 14.9531i)
; for the natural logarithm
; 3 R/S (1.2357 + .6202i)
01    23 00 ; STO 0
02       01 ; 1
03    14 71 ; x=y
04    13 15 ; GTO 15
05       22 ; R↓
06       02 ; 2
07    14 71 ; x=y
08    13 33 ; GTO 33
09       22 ; R↓
10       03 ; 3
11    14 71 ; x=y
12    13 45 ; GTO 45
13       22 ; R↓
14    13 00 ; GTO 00
15    24 02 ; RCL 2
16    24 01 ; RCL 1
17    15 09 ; →P
18    24 03 ; RCL 3
19    14 03 ; y^x
20    23 00 ; STO 0
21       21 ; Swap xy
22    24 03 ; RCL 3
23       61 ; X
24       31 ; ENTER
25    14 04 ; sin
26    24 00 ; RCL 0
27       61 ; X
28       21 ; Swap xy
29    14 05 ; cos
30    24 00 ; RCL 0
31       61 ; X
32    13 00 ; GTO 00
33    15 33 ; RAD
34    24 01 ; RCL 1
35    15 07 ; e^x
36    24 02 ; RCL 2
37    14 04 ; sin
38       21 ; Swap xy
39       61 ; X
40    14 73 ; LASTx
41    24 02 ; RCL 2
42    14 05 ; cos
43       61 ; X
44    13 00 ; GTO 00
45    15 33 ; RAD
46    24 02 ; RCL 2
47    24 01 ; RCL 1
48    15 09 ; →P
49    14 07 ; ln
50    13 00 ; GTO 00
Derivative-go25.txt
; Derivative-go25.txt
; Derivative Program
; Calculate the numeric derivative
;
; Instructions:
; 1. When entering the program, the function for the required derivative starts on Step 27
; 2. Use R0 as the independent variable.  You can use R5, R6, and R7 for constants.
; 3.   Store a tolerance level in R1.  I recommend 0.01.
; 4. The last four lines of the program MUST be:
;  RCL 04
;  x=0
;  GTO 10
;  GTO 19
; The function can have at most 19 steps (for classic HP 25) or 69 steps (GO 25 App).
;  The example function (listed in line 27) is ln x + 3x - 10.8074
;
; Formula (HP 67):
; [f(x+Δx/2)-f(x-Δx/2)]/Δx = f'(x)
01       00 ; 0
02    23 04 ; STO 04
03    24 00 ; RCL 00
04    24 01 ; RCL 01
05       02 ; 2
06       71 ; ÷
07       51 ; +
08    23 00 ; STO 00
09    13 27 ; GTO 27
10       22 ; R↓
11    23 02 ; STO 02
12       01 ; 1
13    23 04 ; STO 04
14    24 00 ; RCL 00
15    24 01 ; RCL 01
16       41 ; -
17    23 00 ; STO 00
18    13 27 ; GTO 27
19       22 ; R↓
20    23 03 ; STO 03
21       32 ; CHS
22    24 02 ; RCL 02
23       51 ; +
24    24 01 ; RCL 01
25       71 ; ÷
26    13 00 ; GTO 00
27    24 00 ; RCL 00
28    14 07 ; ln
29    24 00 ; RCL 00
30       03 ; 3
31       61 ; x
32       51 ; +
33       01 ; 1
34       00 ; 0
35       73 ; .
36       08 ; 8
37       00 ; 0
38       07 ; 7
39       04 ; 4
40       41 ; -
41    24 04 ; RCL 04
42    15 71 ; X=0
43    13 10 ; GTO 10
44    13 19 ; GTO 19
45    13 00 ; GTO 00
Lower Incomplete Gamma-go25.txt
; Lower Incomplete Gamma-go25.txt
; Ported from HP 65 Math PAC 2
; Similar to the Gamma function but
; γ(a,x) = Integral(e^-t t^(a-1) dt from 0 to x)
;
; a and x must be positive
;
; Instructions: a ENTER x R/S
;
; You can approximate the Gamma function by setting x high enough.
; According to Viktor Toth from rskey.org, for any a<50, setting x=30
; gives the gamma approximation accurate from 8 to 12 digits
01    23 01 ; STO 01
02       21 ; Swap XY
03    23 02 ; STO 02
04    14 03 ; Y^X
05    24 02 ; RCL 02
06       71 ; ÷
07    23 03 ; STO 03
08    24 01 ; RCL 01
09    24 02 ; RCL 02
10       01 ; 1
11       51 ; +
12    23 02 ; STO 02
13       71 ; ÷
14    24 03 ; RCL 03
15       61 ; x
16    23 03 ; STO 03
17       51 ; +
18    14 61 ; X≠Y
19    13 08 ; GTO 08
20    24 01 ; RCL 01
21    15 07 ; e^X
22       71 ; ÷
23    13 00 ; GTO 00
Midpoint Rule-go25.txt
; Midpoint Rule-go25.txt
; Numerical Integration using the Midpoint Formula
; Property of Eddie Shore
;
; Instructions:
; 1. Store lower limit in R1
; 2. Store upper limit in R2
; 3. Store number of intervals in R3
; 4. In run mode, press f CLEAR PRGM and the R/S
;
; Input the function at Step 32.  End the function with the instruction GTO 20.  Registers R0 and R7 are free.  The function starts with x_i on the x-stack.
;
; Registers Used
; R1 = a
; R2 = b
; R3 = n
; R4 = h = (b - a)/n
; R5 = sum
; R6 = counter
;
; The example function included in this program is:
; 2 + cos(2 sqrt(x))
; {RAD SQRT 2 x COS 2 + GTO 20}
01       01 ; 1
02    23 06 ; STO 06
03       00 ; 0
04    23 05 ; STO 05
05    24 02 ; RCL 02
06    24 01 ; RCL 01
07       41 ; -
08    24 03 ; RCL 03
09       71 ; ÷
10    23 04 ; STO 04
11    24 06 ; RCL 06
12       73 ; .
13       05 ; 5
14       41 ; -
15    24 04 ; RCL 04
16       61 ; x
17    24 01 ; RCL 01
18       51 ; +
19    13 32 ; GTO 32
20 23 51 05 ; STO + 05
21       01 ; 1
22 23 51 06 ; STO + 06
23    24 06 ; RCL 06
24    24 03 ; RCL 03
25    14 41 ; X<Y
26    13 28 ; GTO 28
27    13 11 ; GTO 11
28    24 05 ; RCL 05
29    24 04 ; RCL 04
30       61 ; x
31    13 00 ; GTO 00
32    15 33 ; RAD
33    14 02 ; √
34       02 ; 2
35       61 ; x
36    14 05 ; cos
37       02 ; 2
38       51 ; +
39    13 20 ; GTO 20
40    13 00 ; GTO 00
Sum-go25.txt
; sum-go25.txt
; Sum Program (Updated Instructions)
; Eddie Shore, 4/10/2011
; The registers used in this program are:
; R1 = initially, the user will load the lower limit.  Register 1 will also act as the independent variable in the function (i)
; R2 = the upper limit, which the user loads
; R3 = the sum, calculated during the program
; The function starts at Step 16.
; Required ending commands:
; GTO 05
; Instructions:
; 1.  In RUN Mode, press GTO 16
; 2.  Switch to PRGM mode, enter the function.  Anything previously written will be overwritten (replaced).
; The program loads R_1 (i) in the display.  The Register for the independent variable is R_1. End the function with the command GTO 05.
; 3. Switch to RUN mode. Load the lower limit in R_0 and the upper limit in R_1.
; 4. Press f CLEAR PRGM, R/S.
; R1 = a, independent variable in f(R1)
; R2 = b
; R3 = sum
;
; Enter your function, f(R1) at line 16.  The function MUST end with GTO 05.
; The function can be anything.  As a example: the Zeta Function (slow converging) to calculate ζ(2).
; Preload R1 and R2 before running the program.
01       00 ; 0
02    23 03 ; STO 03
03    24 01 ; RCL 01
04    13 16 ; GTO 16
05 23 51 03 ; STO + 03
06       01 ; 1
07 23 51 01 ; STO + 01
08    24 01 ; RCL 01
09    24 02 ; RCL 02
10    14 41 ; X<Y
11    13 13 ; GTO 13
12    13 03 ; GTO 03
13    24 03 ; RCL 03
14       74 ; R/S
15    13 00 ; GTO 00
16    15 02 ; X^2
17    15 22 ; 1/X
18    13 05 ; GTO 05
19    15 74 ; NOP
20    15 74 ; NOP
21    15 74 ; NOP
22    15 74 ; NOP
23    15 74 ; NOP
24    15 74 ; NOP
25    15 74 ; NOP
26    15 74 ; NOP
27    15 74 ; NOP
28    13 00 ; GTO 00
If you attempt a calculation containing an improper operation - say, division by zero - the display will show Error. To clear, press v.
The following are improper operations:
Settings are built into the calculator, except Apple TV where they are part of the tvOS Settings App. Available Settings options are device dependant - here are their default values:
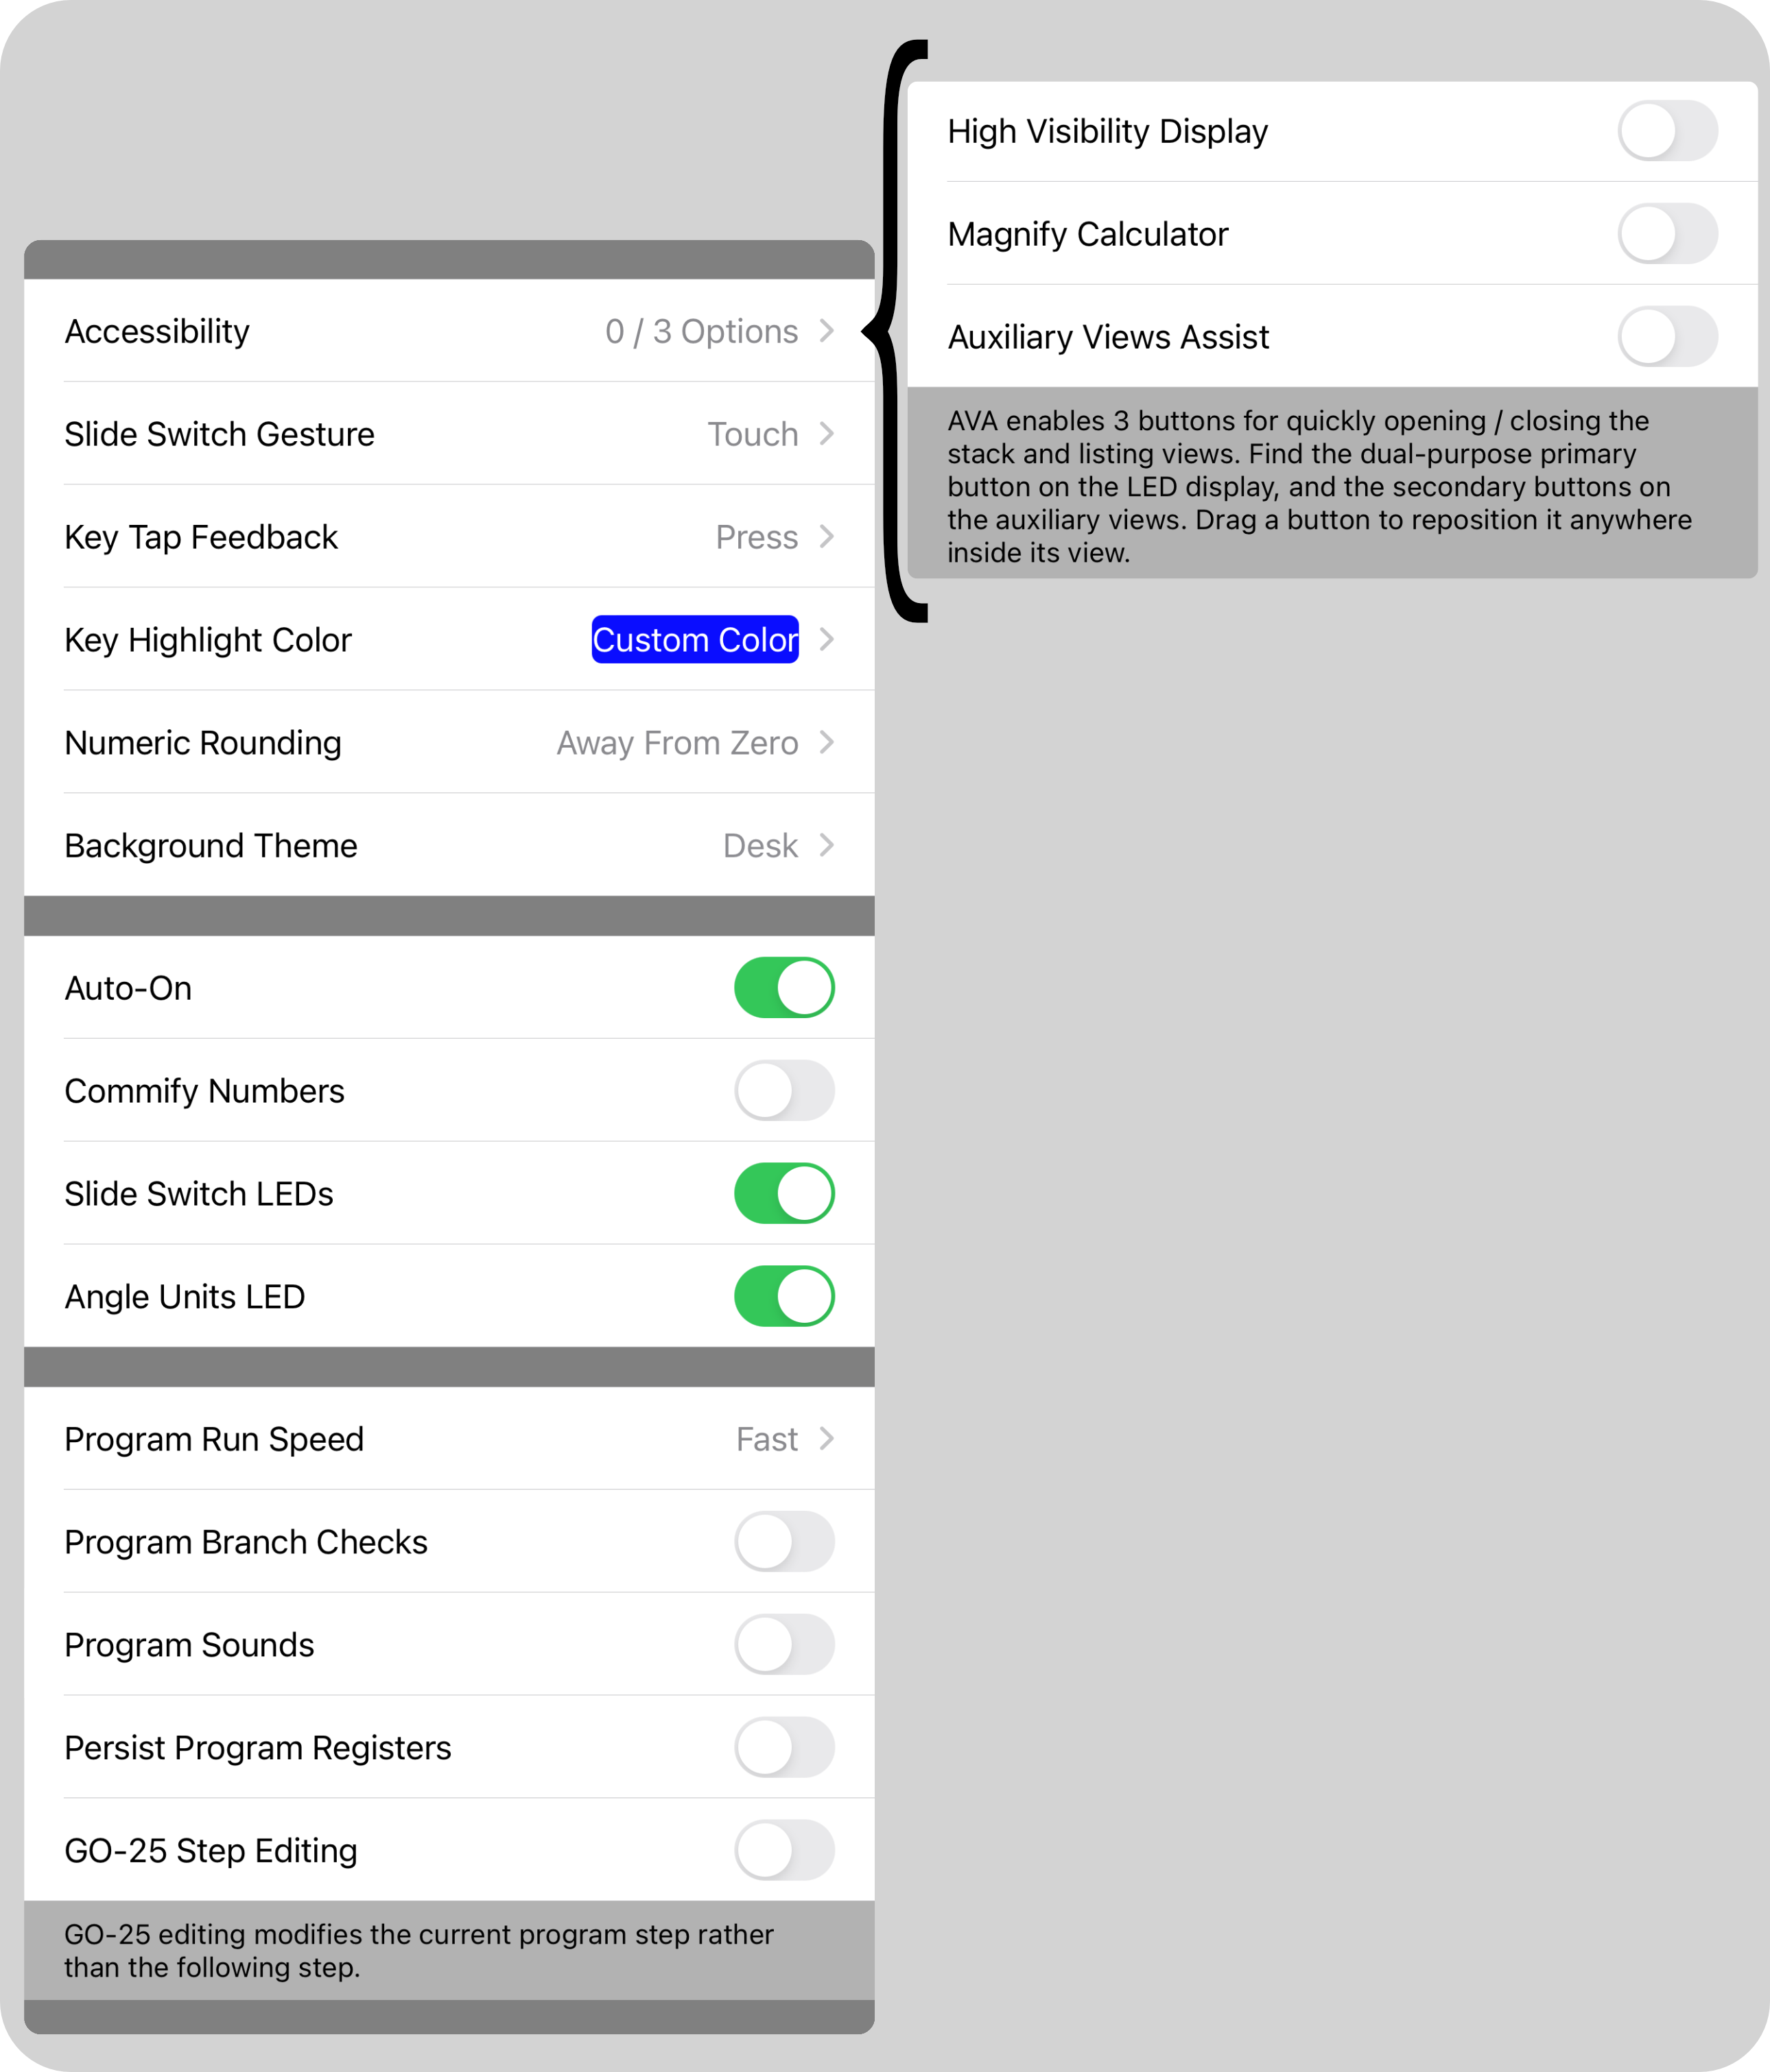
Reminder: There are no gestures on Apple TV thus this section is not applicable, see the section GO-25 and Apple TV for details. On macOS taps/touches are pointer clicks, pans/swipes/scrolls are pointer drags.
 as a drag point).
 to alternate between two views.
 .
.
All calculator capabilites are supported on macOS.
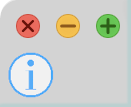
The App has a single window with the three standard window control buttons in the top-left corner:
Some App actions have been duplicated in the macOS menus:
Window Mechanics
Menu Actions
Most calculator capabilites are supported on Apple TV, with these notable exceptions:
Enjoy your trip in the WABAC Machine!
Use the Apple TV remote to move the screen focus left, right, up and down until the desired object is highlighted, then click. The calculator keys are arranged in a regular grid so focus navigation is easy. But to reach the Info button You may rightly view this focus ordering as if the following objects exist in their own logically horizontal row that you can freely traverse left and right:
A focused, clickable object is highlighted: calculator keys with a translucent white overlay, and other objects with a light gold background. When the calculator first starts the initial screen focus is on the Info button for quick access to Help and Settings, as seen in this picture. Note that the OFF-ON switch can never receive the focus because the calculator is always ON.
The Info button actually identifies with both switch-views controls, this means that the focus order is really a ring that you may circle in either direction:
As with iOS and macOS, you can view and scroll the paper tape and program listing on tvOS. Move the focus to the appropriate switch-views control Note: when a scrollable view is visible it inserts itself into the focus ring.
Similarly to iOS and macOS, after moving the screen focus up from the focus ring to the calculator's display area you can initiate context sensitive actions unavailable on a real device:
Focus Navigation
 and either of the two switch-views controls
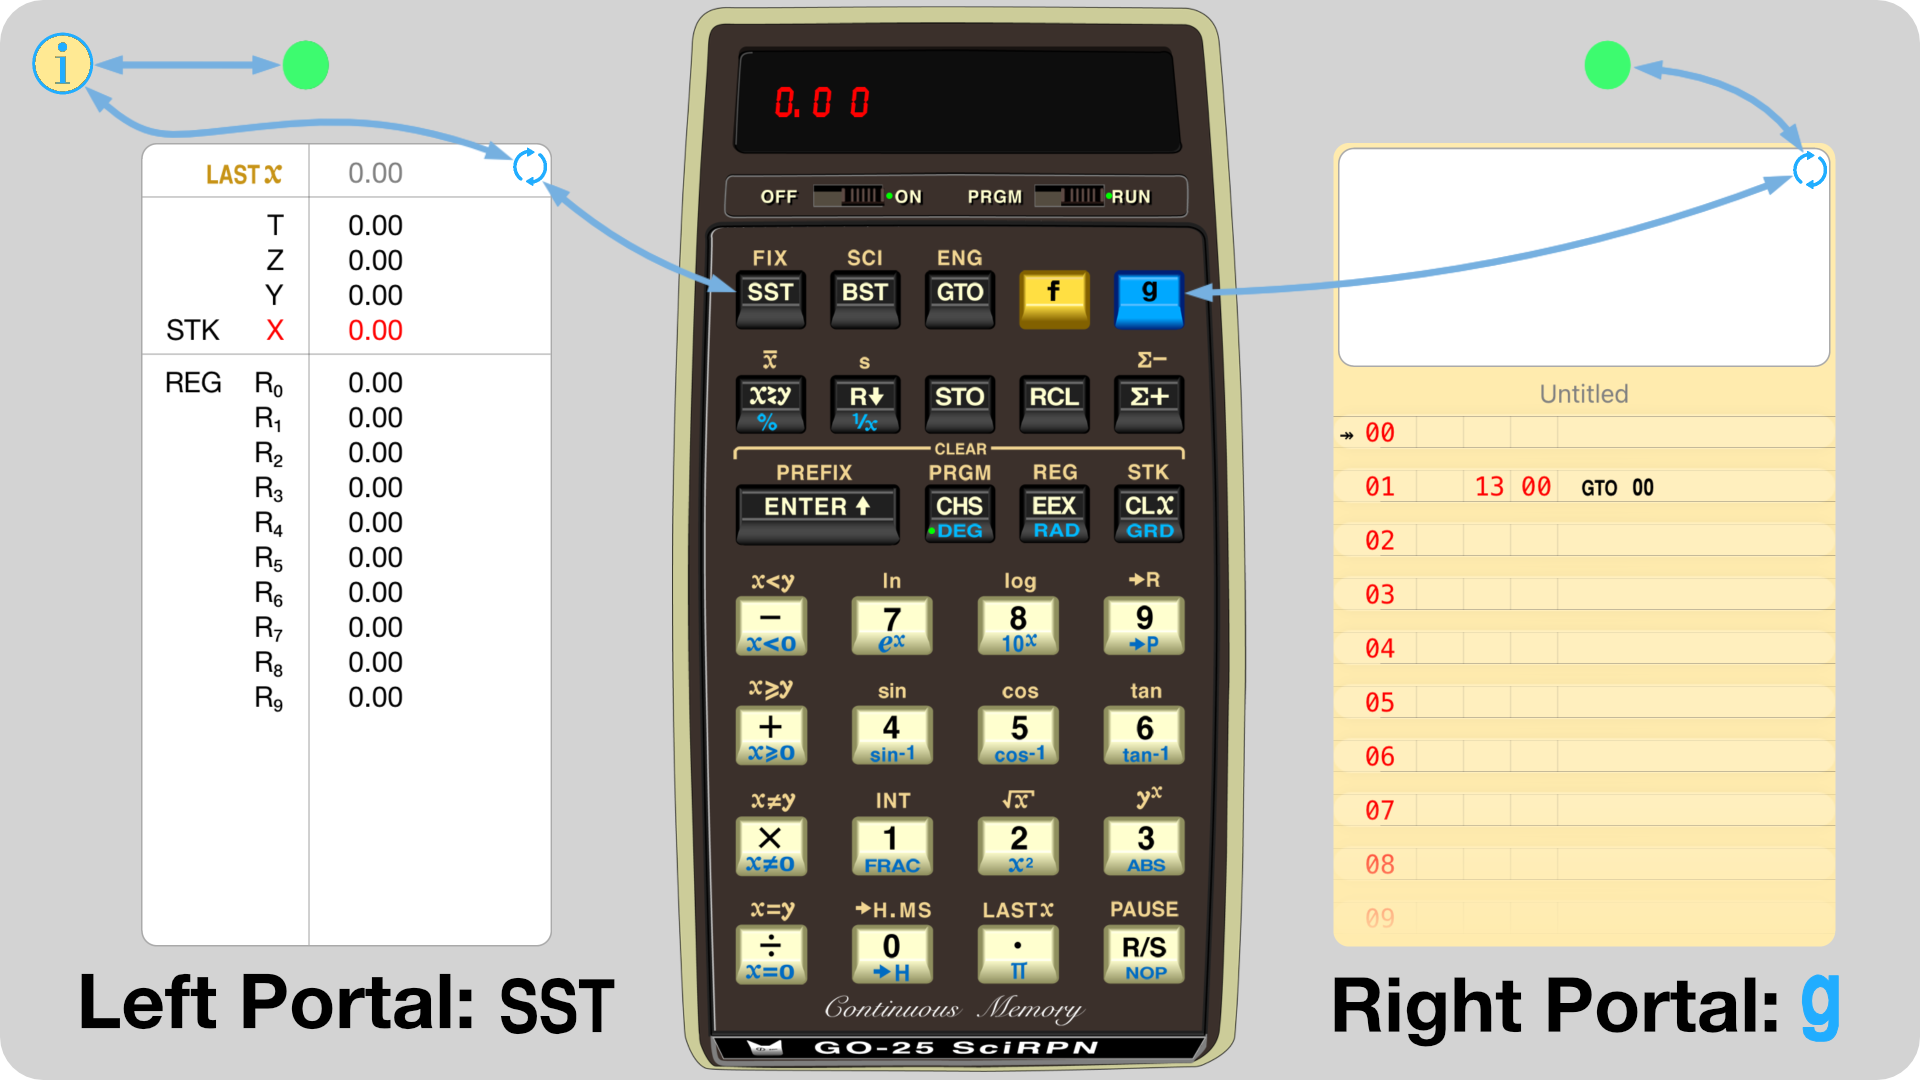
  there is a special path passing through a focus portal key that you must follow in order to move the screen focus in and out of the calculator:
From the left portal key, focus left once to reach the stack and paper tape, focus left a second time to reach the Info button. Simply reverse your path to return to the calculator.
From the right portal key, focus right once to reach the program, and reverse your path to return to the calculator.

Stack

SST
BST
GTO
r
t
Program


 ,
tap the control until the scrollable view of interest is visible, then pan up and down to scroll the contents. When you are finished, pan left or right to move the screen focus to the next object in the focus ring. Remember that
a view is only scrollable when it has the light gold focus.
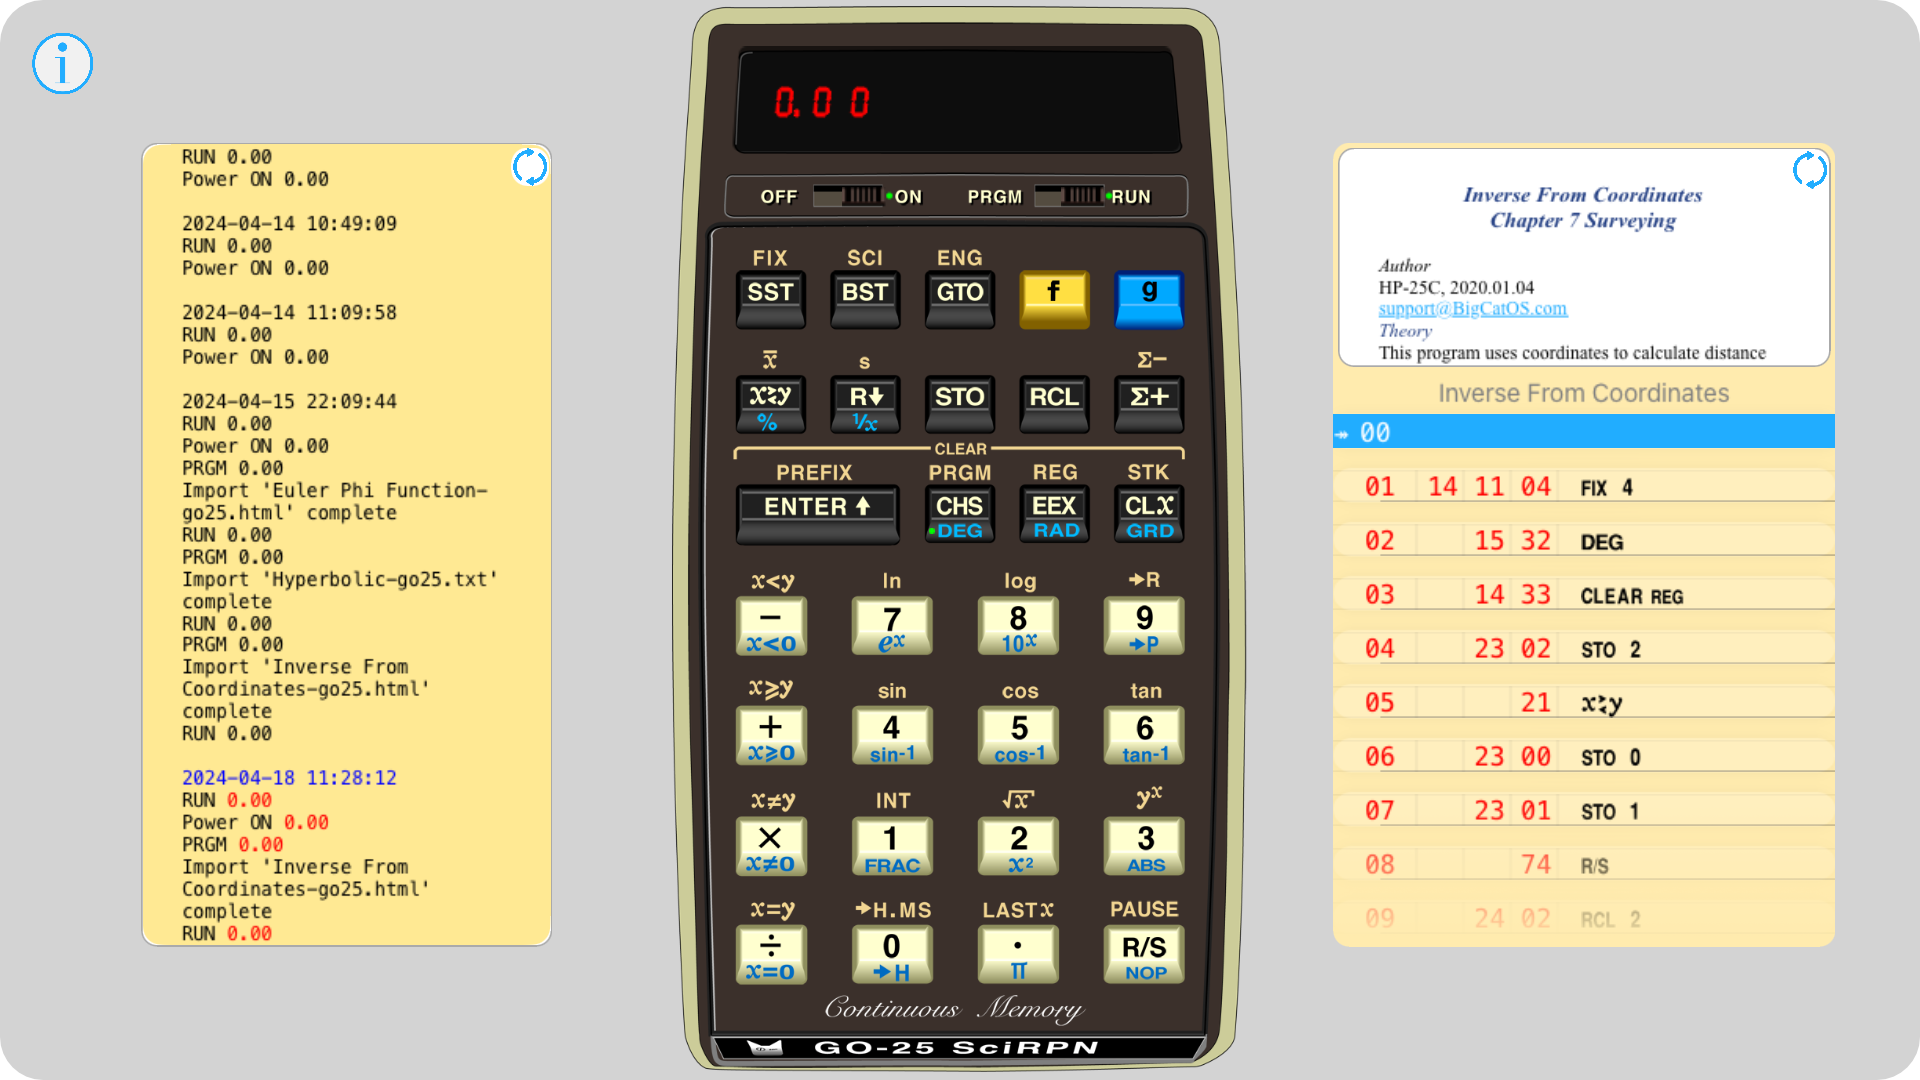
LED Display Focus Actions
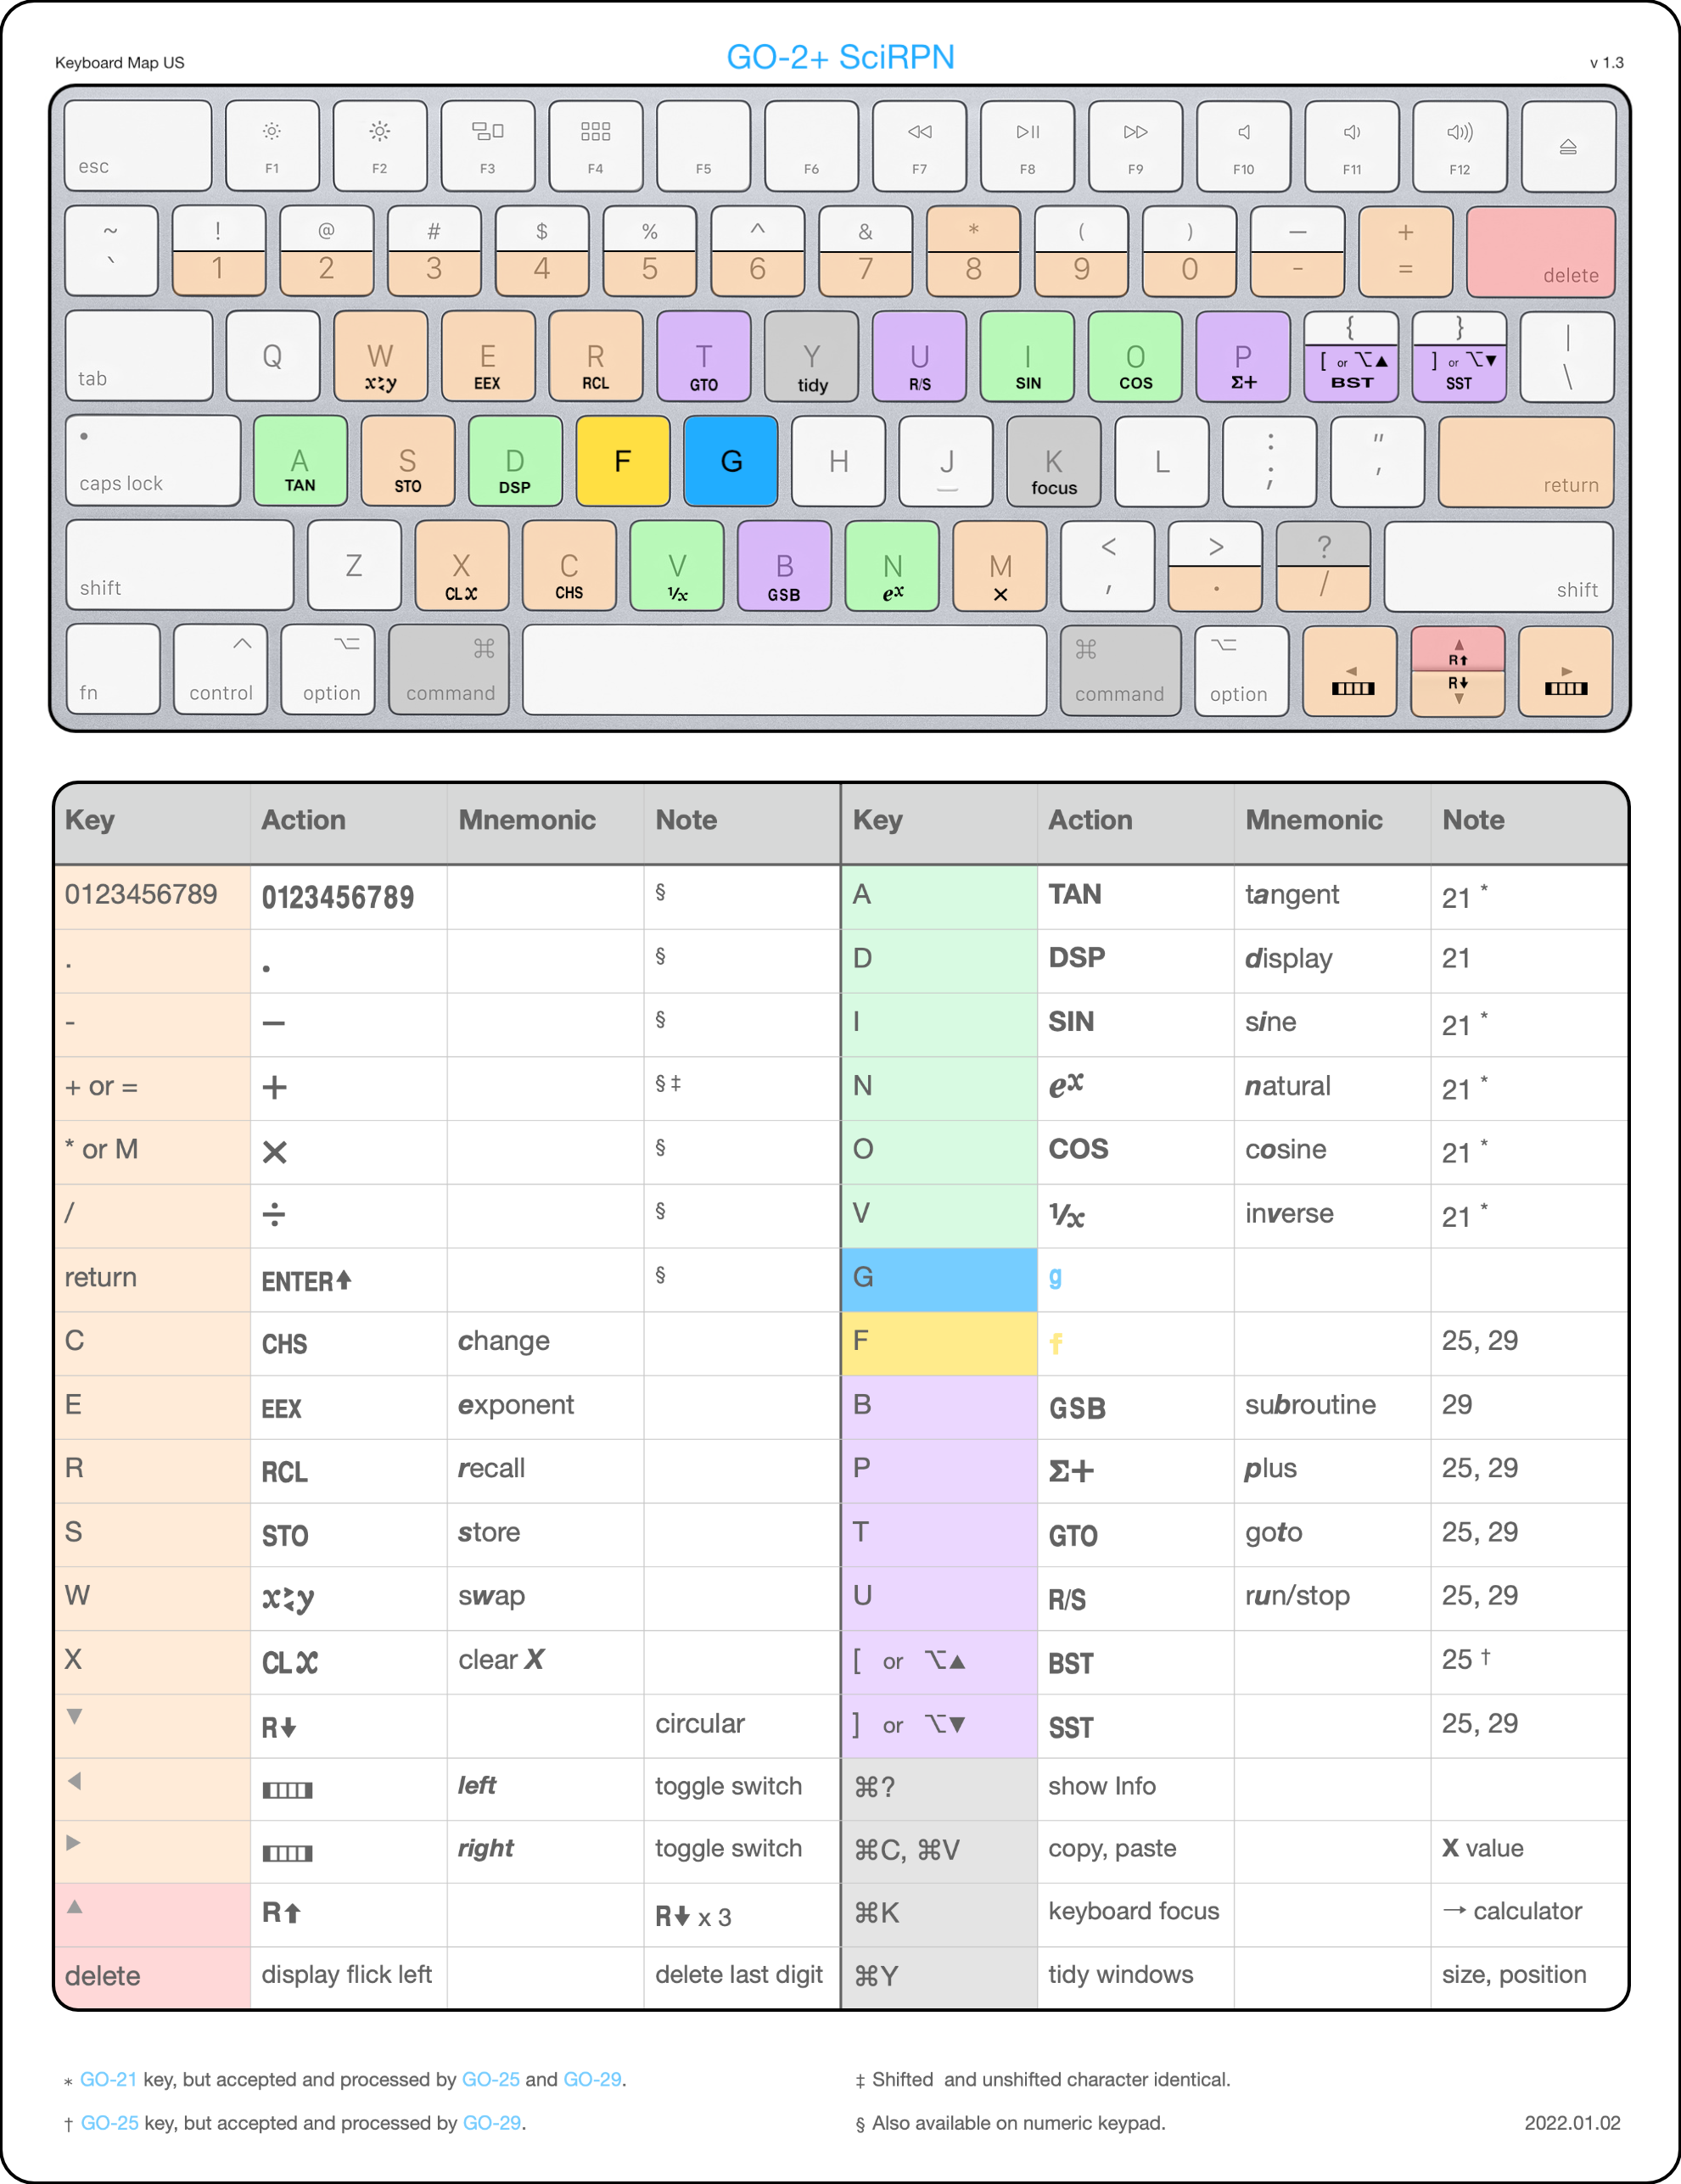
GO-21, GO-25 and GO-29 all provide support for hardware keyboards. You can enter digits and a decimal point into the X register by simply typing those characters, even from a numeric keypad. Use delete instead of a flick left in the display to delete the last character typed, and return instead of z to push the completed number onto the stack.
To enter an exponent of 10 for a floating point number type e instead of c. To change the sign of a mantissa or exponent type c instead of x. To perform any of the four basic arithmetic operations - + ? / on these numbers type - + * /, respectively.
So the keyboard works rather well for simple calculator operations, but it's non-trivial to do more because there are no familiar mappings between keyboard and calculator keys. However, all 30 keys and the 2 slide switches of these calculators have a keyboard equivalent, with 27 keys common to all devices and 6 keys specific to an individual model:
|
|
27 Common |
6 Specific |
|
GO-21 |
orange t |
green |
|
GO-25 |
orange t |
r violet (except ¦) |
|
GO-29 |
orange t |
r violet (except w) |
|
Key(s) |
Action |
|
esc |
Menu |
|
⌃return |
Select |
|
⌃◄ ⌃► ⌃▲ ⌃▼ |
Focus |
|
⌃▲ ⌃▼ |
Pan/Scroll |
| iOS | 14.0 | - | 18.0 |
| iPadOS | 14.0 | - | 18.0 |
| tvOS | 14.0 | - | 18.0 |
| macOS | 10.15 | - | 15.0 |
| visionOS | 1.0 | - | 2.0 |
5.1 - 2024.09.16
5.0 - 2024.05.07
4.6 - 2024.03.08
4.5 - 2022.09.12
4.4 - 2022.02.22
4.3 - 2021.01.01
4.2.1 - 2020.10.14
4.2 - 2020.10.01
4.1 - 2020.09.19
4.0 - 2020.08.12
3.5 - 2020.06.24
3.4 - 2020.06.02
3.3 - 2020.03.19
3.2 - 2020.02.02
3.1 - 2020.01.07
3.0 - 2019.12.25
 to alternate between them.
 to alternate between them.
2.16 - 2019.07.14
2.15 - 2019.03.23
2.14 - 2018.09.14
2.13 - 2018.09.03
2.12 - 2018.04.12
2.11 - 2017.12.20
2.10 - 2017.10.31
2.9 - 2017.10.25
2.8 - 2017.09.19
 .
.
2.7 - 2017.07.11
2.6 - 2016.12.10
2.5 - 2016.06.06
2.4.20 - 2015.02.19
2.4 - 2014.12.16
2.3 - 2014.10.22
2.2 - 2014.09.18
2.1 - 2014.03.18
2.0 - 2013.09.12
1.8 - 2013.06.12
1.7 - 2012.11.09
1.6 - 2012.06.25
1.5 - 2012.04.01
1.4 - 2011.12.12
1.3 - 2011.07.28
1.2 - 2011.06.03
1.1 - 2011.05.04
1.0 - 2010
Copyright (©) 2010 - 2024 BigCatOS. All rights reserved. | Contact